In this page we work through the implementation of a Rock-Paper-Scissors (RPS) game as event-driven on the GameEngine, as part of a course on programming in Java (which starts here). If you have not yet programmed the text/console version of RPS, you probably want to go back and do that.
If you have not yet programmed anything in GameEngine, you should begin with the tutorial on GameMaker, because much of the discussion here depends on some familiarity with the GameEngine. Besides, Pong is a good (easy) game to start with -- then come back here.
If you follow our recommendations and still have problems with your Java code, or with the explanations here (or even the GameEngine) -- that would be my fault, not yours -- summon a Mentor, and somebody will come and work with you to get past the problem. We try to update the documentation to eliminate the problems you find, so your asking also helps future students.
-- or use the "Ask" feature in Zoom.
We always try to do a TDD before we start coding, then code to the design. For event-driven programs using the GameEngine (like today), the first TDD layer is easy, as described in our discussion of event-driven design. The second layer for games like RPS is more complicated, because we have different phases of the game, controlled partly by timing events, and partly by user clicks:
"Handle Events"We will discuss these leaf nodes in the paragraphs to follow. I suggest you don't get too creative on this first cut. Some of this event-driven stuff is pretty tricky, so make it work first along the lines we explain here, then after you understand the process, you can be creative. The Mentors will not be able to help if you run off in some random direction not known to work. After you know what works, you can try the really creative stuff.
Time Events
Click Events = Show Plays"Time Events"
Synchronization
Animation"Show Plays"
Human Play Input
Computer Play
Scoring
Especially for this game, the GameEngine has a RPS sprite, which can be programmed to look like a rock, a piece of paper, or a pair of scissors. To make things more fun, it can also be programmed to "blow up" ending in a cloud of smoke that vanishes. There is no typing, the human player is shown the three icon images, then clicks on one of them (and the other two get hidden). Simultaneously, the computer can be programmed to be rapidly cycling through the three, then freezes on one of them, either the choice of a random number as in the text-based game, or else as a function of when the user clicked -- a true random number, if the resolution is fine enough, because human response time generally does not resolve to less than 20-50ms.
Like the text-based game, the computer will print out three seconds of synchronization, "One... Two... Three..." but you will need a text widget on the game board to display this message as it grows, because the Java console is sooo 19th century, everything the user sees will be on the game board. This is event-driven, so the timing is also event-driven, your game gets a timing event every 100 milliseconds (ten times per second, which is also the game frame rate), so you can carefully synchronize things. Some of your animation is based on the same time events.
You have a lot of flexibility for creativity in this game. Basically you need two scores (text widgets) and four copies of the RPS icon/sprite, but you can put them anywhere you like (I would suggest placing the computer's sprite and its score on one side, and the human sprites and score on the other side. Then you need another text widget stretched out to take messages and instructions to the user, top or bottom or in the middle, anywhere you want it. Text messages can be only one line, so placing it between stuff on the left and right may limit how much you can say in one line (but you could add lines).
Finally -- or maybe first -- you should choose a background color and size. Lazy me, I just kept the default green rectangle. Only one thing, you need to choose a color that contrasts well with the white, gray, and black of the RPS icons, and with whatever color you choose for your text messages. Keep in mind that using two contrasting saturated colors like red/green or blue/orange for text and background makes the text hard to read because the human eye is optomized for differences in brightness rather than hue.
OK, let's get started. You can do your game layout using the graphical
tools in GameMaker, but you also need to think about how the game play
will proceed.
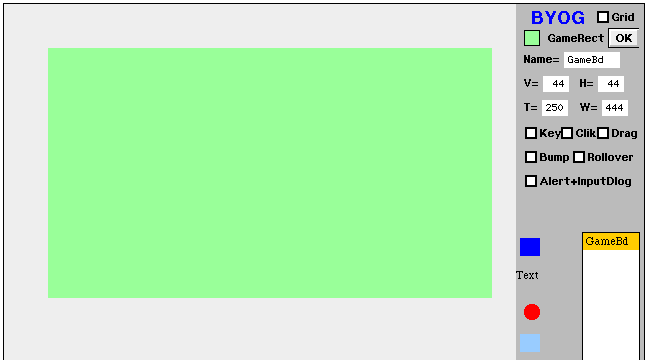
https://replit.com/@NWAPW/#GameEngineYou should already be familiar with the process (ditto if you are using BlueJ), because RPS is not a good game to start with. Anyway, you need to open up the GameMaker window which looks something like this:
On the left side of the window is a (green) game board, which you can resize or change the basic color to anything you like using the color box at the top and the size entry panels below it, both in the right panel. You should pick a suitable Java class name for your calculator -- I called mine "Rips" -- and type it into the place for the name of the game board. This version of GameEngine does not let you drag-select, so you must click to the right of the name that is already there and backspace over it before typing in a new name. You should probably plan on doing this layout two or three times before you are satisfied with it. I threw my first and second attempts away and started over, after I had a better idea what I wanted. Click on the game board or its name in the widget list to select the game board, which also shows a "Start Over (New)" button you can click to discard all your changes.
I started by dragging the Text widget (next below the dark blue tool) onto the board to be my message text. Position its top and left where you want it, then use the Tall and Wide entry fields in the tool panel to set its size. You can either set it to the full width of the space you have, or (more accurately) double-click the "Text" in the widget to pop up a dialog where you can type in the longest message you would ever want to output, then (click OK) you can see how well it fits. You also should choose the Font before setting its size, because larger fonts take more space on the screen for the same text. Click the OK button in the top right of GameMaker tool panel to accept your changes. Oh, I almost forgot, be sure to give this text widget a good Java name, so you can change its text while the program is running; I called mine Announce.
In the same way you can drag a couple more Text widgets onto the game area, one for the human ("You") score, and one for the computer ("My") score -- remember, when this game is being played, the computer is "me" and the human player is "you"; you the programmer would be the human when you are playing your own game. I used one widget each for both the score and its label, but you could simplify the programming slightly by using separate widgets for the score and its label. In any case, your program needs to update the score from time to time, so again, you need a good Java name for each. I called mine HumanS and CompuS, but you can choose any names you like.
Not shown on the screen shot above (it's almost to the bottom of the window) is the RPS icon/sprite. Drag three of them over to the human side of your game board, and one over to the computer side, a total of four. When the game is playing, during the synchronization time, you will show all three on the human side, and the user needs to click on one of them. When you select one of them here in GameMaker, you get some radio buttons to choose which icon shows. One should be Rock, one Paper, and one Scissor. On the other side you can leave it as the mash-up if you like. The human user needs to be able to click (one of) the three icons to choose it, so separately select each icon and check the Clik checkbox. Give them good Java names, then click OK to accept your changes. The computer icon should not be clicked while the game is running (so don't check its Clik checkbox) but it still needs a good name so you can change its appearance on the fly.
When you are happy with the general appearance of your game widgets,
click the Build button that appears in the same place after you
have clicked the OK button. This converts your
widget list and specifications into a Java class, which you can then fill
out with the Java code only you (will) know how to write. Then close the
GameMaker window.
In BlueJ, the first time you do this, you need to right-click the background behind the yellow rectangles in the BlueJ dashboard window, and choose the "Add Class from File" menu, and select the name of your game. This makes another yellow rectangle which you can double-click to open its text in an editor window.Verify that your stub code compiles and runs. It won't do anything except put up your window with the text and RPS widgets. Close the window to terminate it. This verification is important, because it establishes the fact that the generated code is good (if the window does not open, you can try the ideas in the "Trouble-Shooting GameEngine" page, or else get help, this may be beyond your ability to fix). Later, after you have added your own code -- basically copying what I show you, this first time -- if it fails to compile, you know it was something you did. Don't feel bad, I make mistakes all the time, that's what the Backspace key on the keyboard is for
In the code editor panel, you will see some lines with dollar '$' signs in them. DON'T MESS WITH THE '$' LINES, GameMaker uses them to find where to insert its generated code. Think of GameMaker as your programming partner, you wouldn't want to mess up your partner's code, would you? I mean, you can and nobody gets hurt, except that GameMaker may tell you the file is corrupt and you lose all your work in it. Me, I'm too lazy to keep typing the same thing over and over. Outside the lines enclosed by and including the dollars, this is your program, do anything you want (but it still must be good Java if you want it to compile and run).
Now we can start to think in Java. Recall that we made three Text widgets, one for announcements and two for scores. You can see their declarations between the dollar lines near the front of this generated code. They are type GameWgt, as are also the four RPS sprites. As explained previously in "Objects In GameEngine," there are different subclasses of GameWgt, but they all look on the surface like widgets. Only the text widgets can have their text set using the PutTextLn method, but that method requires a String parameter. For messages to the user, that's exactly what we want, but when we keep score we want to be able to add (not concatenate) +1 to the running score, and it needs to be a number (int) for that to work in a strongly typed language like Java. So we need a couple integer variables to keep scores in, and they need to be instance variables (declared at the class level) so the scores don't disappear between events.
In particular, at the top of the file you will see all your widget names declared (between dollar lines); you can declare your own instance variables in the white space below the second dollar line. Mine looks like this after I added the two variables that need to persist between events:
public class Rips extends GameEvent {
JavaGame myGame = null; // soon: reference to the GameEngine
GameWgt Rips = null; // reference to the game board widget
/// ($) Begin generated class variables (do not modify) ($..)
GameWgt Announce = null, HumanS = null, CompuS = null, CompuW = null,
HumanX = null, HumanR = null, HumanW = null;
/// (..$) End generated class variables ($) (do not modify this line)
int Hscore = 0, Cscore = 0; // added instance variablespublic String toString() {return "(Rips)";} //~toString
Some lines farther down there is a Startup method with
a couple more dollar lines, where the generated variable(s) are initialized.
Again, you may insert your own initialization code after the second dollar
line.
I added one line, to initialize the
display to "0.0":
public void StartUp() {
if (myGame != null) myRips = myGame.FindListWgt("{Rips}");
/// [$] Begin generated StartUp code (do not modify) [$..]
if (myGame==null) return;
Announce = myGame.FindListWgt("{Announce}");
HumanS = myGame.FindListWgt("{HumanS}");
CompuS = myGame.FindListWgt("{CompuS}");
CompuW = myGame.FindListWgt("{CompuW}");
HumanX = myGame.FindListWgt("{HumanX}");
HumanR = myGame.FindListWgt("{HumanR}");
HumanW = myGame.FindListWgt("{HumanW}");
if (CompuW != null) myGame.LoadRPSpix(CompuW,7);
if (HumanX != null) myGame.LoadRPSpix(HumanX,3);
if (HumanR != null) myGame.LoadRPSpix(HumanR,2);
if (HumanW != null) myGame.LoadRPSpix(HumanW,1);
/// [..$] End generated StartUp code [$] (do not modify this line)
if (DisplayTx != null) {int tmp = DisplayTx.PutTextLn("0.0");}} //~StartUp
Most of the remaining methods are "stubbed out" (comments only).
You will be using one of these, and you need to remove the double slants
from the front of its lines (so they are no longer comments, but real code).
The methods you don't need you can let the defaults do their thing, and
either leave them commented out, or else remove those methods entirely.
How do you know which ones you don't need? We're coming to that.
Don't forget to add a second call to your own Rips.main() (or whatever your class name is) to the Replit Main class main, then comment it out when you want to be in the GameMaker.
Now we are about to hit some of the reasons programming event-driven (human-oriented) software is so much harder than programming flat files like a machine. In RPS, the real hand game between two humans, the two players need to be synchronized ("One... two... three...") so that nobody has an unfair advantage by seeing the other person's play before making their own choice. Obviously the computer has no eyes to see the human player's hand -- well, most computers these days have a net camera, but programming vision is really hard -- so we make the human player click on the particular play they want this turn. And the computer -- that would be your responsibility, as programmer -- needs to promise to make its own choice before looking at the human click. But it feels more like a real game is you have the synchronization count.
So what if the human player isn't ready? The computer can't see them, remember? So what I did is have a pre-synchronization interaction, where the computer announces the beginning of a round, and waits for the human to click anywhere. Then we know we have the human player's attention, and we can begin with the "One... two... three..." synchronization in the message field.
So now we have clicks meaning two different things, depending on what part of the game we are in. This is different from the event-driven calculator, where each click on a widget does exactly one thing, and the computer just does it when it happens. In flat-file programming the computer controls that absolutely, but this is event-driven.
It gets worse. After the human and computer have made their plays, and the computer program has determined who won this round, we want to take a little time to blow up the losing play and to gloat (or whine) at the result. During that time, no clicks should have any effect. Or maybe if we are super-clever, we can take a click at that time as eliminating the pre-synchronization and going directly to the "One... two... three..." synchronization that begins the next round.
So what we have is the computer program is in a state or mode, where it certain rules apply, then it advances to the next state where (possibly) different rules apply, and so on. This is called a finite-state machine and it is a fundamental concept in computing. So we have essentially three states -- like good computer geeks, our counts always start at zero:
0. Initialization, where it is waiting for the human to clickOh wait, there are actually three states there, each second changes the display. So the revised list of states:1. Synchronization, counting "One... two... three..." at 1-second intervals
0. Initialization, where it is waiting for the human to click1. Synchronization One, holding "One..." on the message line for one second
2. Synchronization Two, holding "One... two..." on the message line for one second
3. Synchronization Three, holding "One... two... three..." on the message line for up to three seconds
4. Announce the winner while animating the explosion of the losing play (about 2 seconds), or else
5. Announce the tie (about 2 seconds), then go back to state 0.
State 0 has no timeout, it just sits there indefinitely, waiting
for a click anywhere -- oops, right now only the three human icon widgets
are clickable. This happens to me a lot, I figure out I need something
in an earlier phase of the programming process, and so I need to go back
and fix it. In Replit, just change the class name called from the Main.main()
startup method back to JavaGame and Run, then close the
window after your fixes and change the class name back to your game.
In BlueJ you may need to close the Java text window (or at least its tab) -- maybe BlueJ will notice the changes made by GameMaker, but I wouldn't want to bet on it -- and restart GameMaker (which will open with your saved widgets) and with the game board selected, check also its Clik checkbox. Then OK and Build, and 2-click to open the source text window again.So when we get a click in state 0, we advance to state 1 and start the synchronization timer. Not this first time, but later (after it is basically working) we might want to detect the human choice of rock/paper/scissors too early, and (giggle, giggle) have the computer play to have seen it (and win!). Try to get the minimum functionality working before you add on nifty stuff like that.
State 1 advances to state 2 with the larger message text, and that advances to state 3 even larger.
State 3 waits up to three seconds before giving up and returning to state 0. A click on one of the human choice icons in state 3 hides the other two icons, then calculates the score and advances to either state 4 or 5, which when it times out returns to state 0.
State 4 will eventually animate the explosion of the loser's icon, but the first cut will just sit there (like state 5).
In the next page we will work out the timing in more detail and start writing the Java code for RPS.
<<Previous | ToC | Next >>
Revised: 2023 March 20